How to Build a Concrete Patio Step by Step: The Complete 2026 Guide
Reading time: 14 minutes
Ever stared at your barren backyard and imagined it transformed into a stunning outdoor living space? You’re not alone. In 2026, outdoor living improvements remain one of the top home renovation priorities across North America — and a properly built concrete patio sits at the heart of most of those transformations.
Here’s the straight talk: building a concrete patio isn’t just about pouring gray slop on the ground. It’s a structured process that, when done right, adds significant property value, creates usable square footage, and lasts 30 to 50 years with minimal maintenance. According to the National Association of Realtors’ 2025 Remodeling Impact Report, a well-executed concrete patio project returns approximately 48% of its cost at resale — making it one of the smarter outdoor investments you can make.
Whether you’re a first-time DIYer or someone who’s tackled a deck or two, this guide walks you through every step with precision, practical tips, and real-world context. Let’s build something that lasts.
Table of Contents
- Why Choose Concrete for Your Patio?
- Planning and Design: Getting It Right Before You Dig
- Tools and Materials You’ll Need
- Step 1 – Site Preparation and Excavation
- Step 2 – Building the Sub-Base and Gravel Layer
- Step 3 – Setting Up Formwork
- Step 4 – Adding Reinforcement
- Step 5 – Mixing and Pouring the Concrete
- Step 6 – Finishing the Surface
- Step 7 – Curing Properly
- Common Challenges and How to Overcome Them
- Cost Comparison Table
- FAQs
- Your Patio, Built Right: Next Steps
Why Choose Concrete for Your Patio?
Before we pick up a shovel, it’s worth understanding why concrete remains the gold standard for patios in 2026. You could choose pavers, composite decking, natural stone, or gravel — and each has its merits. But concrete offers a combination of durability, customizability, and cost-effectiveness that’s hard to beat.
Quick scenario: Imagine two neighbors. Sarah opts for a stamped concrete patio at $8 per square foot. Tom goes with natural bluestone at $22 per square foot. Five years later, Sarah’s patio looks virtually identical to day one after one annual sealing session. Tom’s stone has shifted, cracked in two spots due to freeze-thaw cycles, and cost him $1,200 in repairs. The lesson? Concrete’s monolithic structure is often its greatest asset.
Modern concrete has also evolved dramatically. In 2025 and into 2026, fiber-reinforced concrete mixes, pervious (permeable) concrete, and polished or exposed-aggregate finishes have made concrete patios genuinely beautiful — not just functional.
Planning and Design: Getting It Right Before You Dig
Rushing into excavation without a solid plan is the single biggest mistake DIYers make. Proper planning saves you time, money, and an enormous amount of frustration down the road.
Determining Size and Layout
Start by measuring your intended patio area. A good rule of thumb: allow at least 25 square feet per person for comfortable outdoor entertaining. Most residential patios fall between 200 and 400 square feet, though larger properties often go up to 600 square feet or more.
Consider these layout factors:
- Traffic flow – How will people move from the house to the patio and yard?
- Sun and shade patterns – A west-facing patio can become unbearably hot in summer afternoons
- Drainage direction – Concrete must slope at least 1/8 inch per foot away from the house
- Underground utilities – Call 811 (USA) or your local equivalent before digging. This is not optional.
- Local permit requirements – In 2026, most municipalities require permits for patios over 200 square feet
Choosing Your Concrete Mix and Finish
Not all concrete is created equal. For a residential patio, you want a mix that achieves at least 4,000 PSI compressive strength after 28 days of curing. Here’s what influences your choice:
- Standard broom finish – Affordable, slip-resistant, classic look
- Exposed aggregate – Attractive texture, great for pool surrounds
- Stamped concrete – Mimics stone, brick, or wood; higher cost but stunning results
- Pervious concrete – Allows water infiltration; increasingly popular in 2026 due to stormwater regulations
- Polished concrete – Smooth, reflective finish; requires more maintenance
Pro Tip: If you’re in a region with harsh freeze-thaw cycles (much of the northern U.S. and Canada), always specify air-entrained concrete with 5–7% air content. This microscopic air bubble network prevents spalling and cracking when water freezes inside the slab.
Tools and Materials You’ll Need
Gathering your tools before you start prevents those frustrating mid-project hardware store runs. Here’s your master list:
Tools:
- Tape measure and marking paint or stakes/string
- Sod cutter or spade (for excavation)
- Plate compactor (rent from your local equipment rental store, approximately $70–$90/day in 2026)
- Circular saw or hand saw (for cutting form boards)
- Level and screed board (a straight 2×4 works)
- Bull float and hand float
- Concrete trowel (finishing trowel)
- Stiff-bristle broom (for broom finish)
- Concrete mixer or wheelbarrow (for smaller pours)
- Concrete vibrator (for larger pours; prevents air pockets)
- Jointing tool (for control joints)
- Safety gear: gloves, knee pads, eye protection, rubber boots
Materials:
- Ready-mix concrete (delivered by truck) or bagged concrete mix
- Crushed gravel (3/4 inch) for sub-base — typically 4 inches deep
- 2×4 or 2×6 lumber for forms
- Deck screws and wooden stakes
- Rebar (#4 rebar is standard) or wire mesh
- Rebar chairs or wire mesh supports
- Expansion joint material (foam backer rod)
- Concrete sealer (acrylic or penetrating sealer)
- Plastic sheeting or curing compound
Step 1 – Site Preparation and Excavation
With your plan drawn and materials gathered, it’s time to break ground. This phase sets the physical foundation — literally — for everything that follows.
Mark your area using stakes and string lines. Double-check your layout with the “3-4-5 triangle method” to ensure perfect 90-degree corners: measure 3 feet along one string, 4 feet along the perpendicular string, and the diagonal between those two points should be exactly 5 feet.
Excavate to the correct depth. For a standard 4-inch concrete patio, you’ll excavate about 7 to 8 inches total — 4 inches for gravel sub-base, plus 4 inches for the concrete slab itself. In cold climates, increase the gravel base to 6 inches for better drainage and frost protection.
Remove all organic material including grass, roots, and topsoil. Organic matter decomposes over time, creating voids beneath the slab that cause cracking and sinking. This is a step you cannot shortcut.
Grade for drainage. Use a level and string to confirm your slope: a minimum of 1/8 inch drop per foot moving away from the house. For a 12-foot-wide patio, that means the outer edge should be at least 1.5 inches lower than the edge at the house foundation.
Step 2 – Building the Sub-Base and Gravel Layer
This step is the unsung hero of patio longevity. A properly compacted gravel base distributes weight, promotes drainage, and prevents frost heaving — all of which protect the concrete above it.
Spread your crushed gravel (compactable road base or 3/4-inch clean crushed stone) in 2-inch layers, compacting each layer thoroughly with the plate compactor before adding the next. This process, called lift compaction, ensures you achieve 95% or higher compaction density. Dumping all your gravel in at once and running the compactor over it once simply won’t achieve the same result.
After compaction, the gravel surface should be firm enough that walking on it leaves no footprint. Use a level board to check the surface is even and maintaining your intended slope.
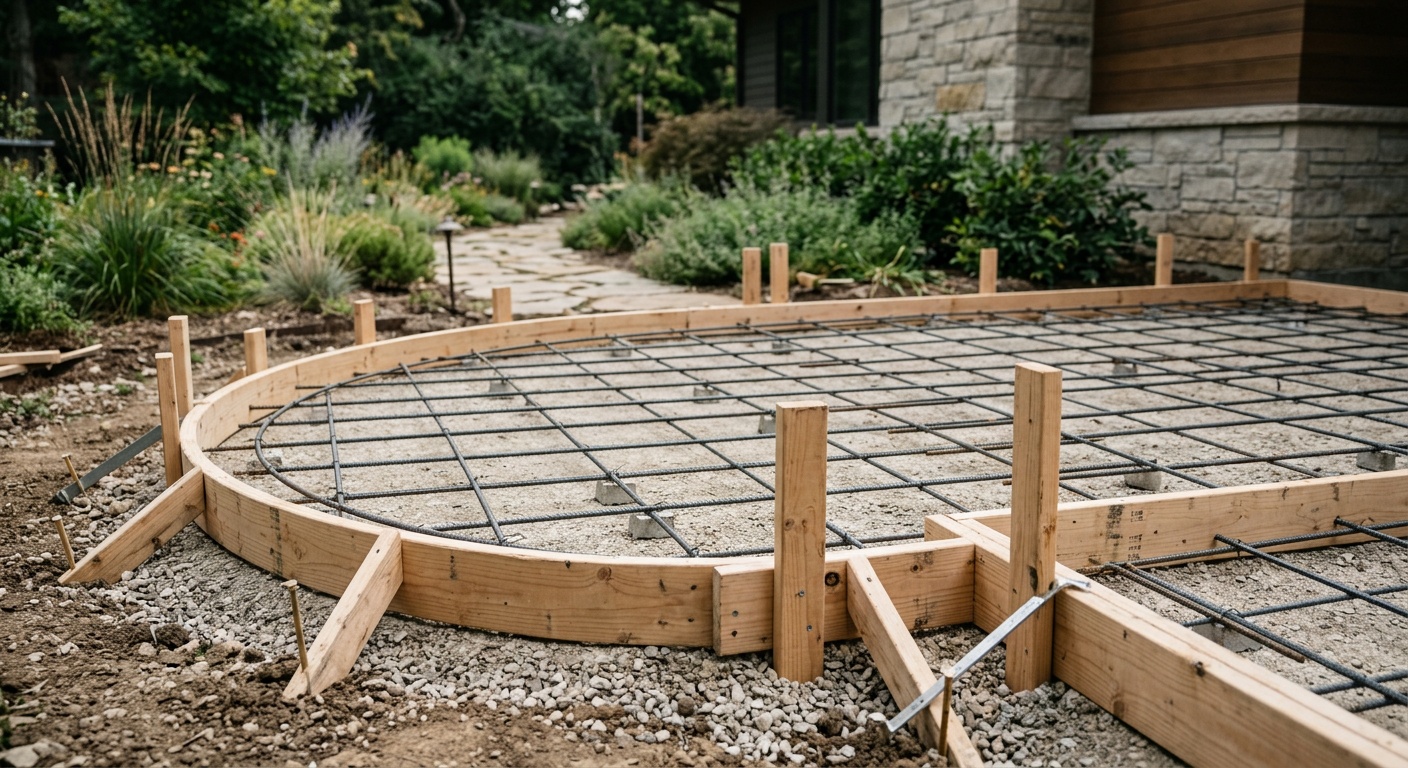
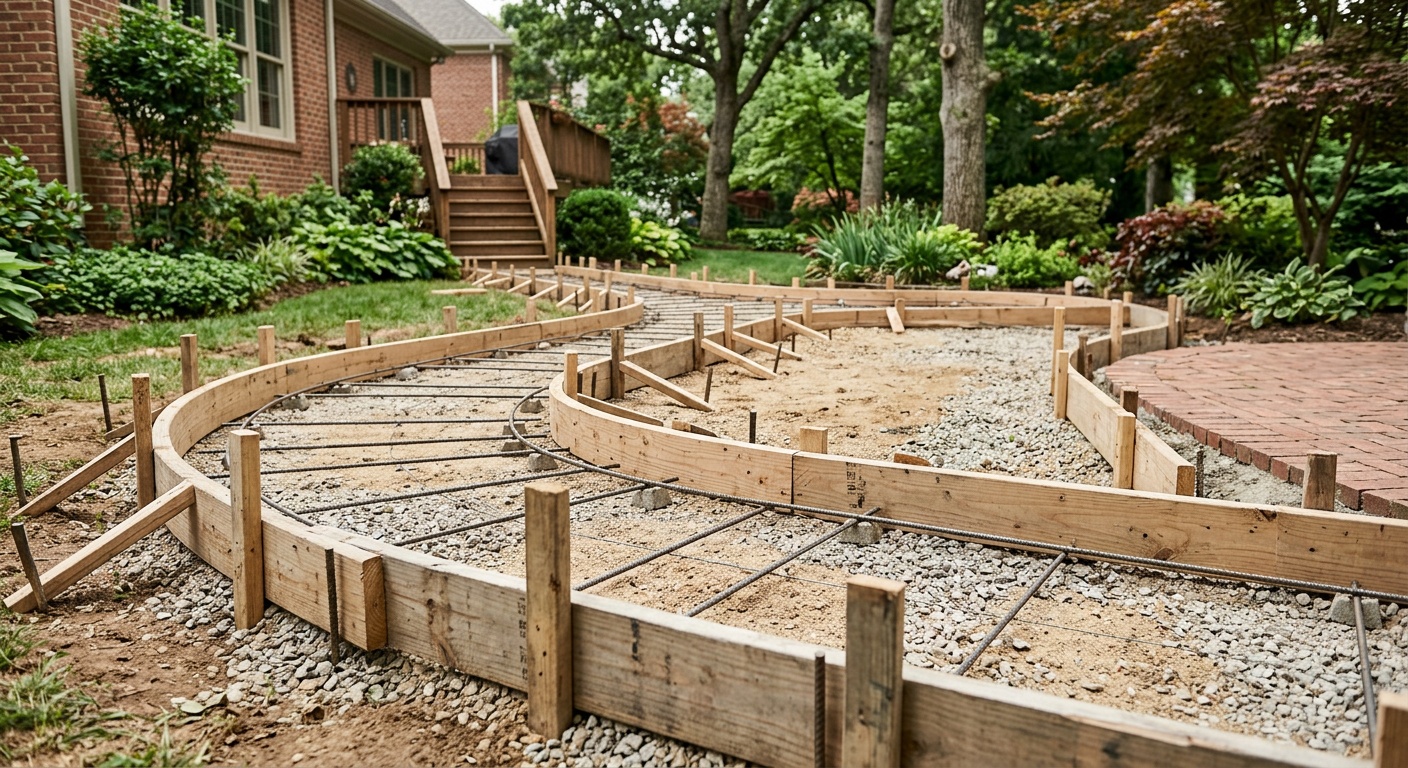
Step 3 – Setting Up Formwork
Formwork is the temporary framework that holds wet concrete in place while it cures. For most patios, 2×4 lumber works fine for a 4-inch slab; use 2×6 if you’re pouring thicker. In 2026, some builders are also using aluminum or steel forms for larger projects due to their reusability and rigidity.
Drive stakes every 2–4 feet along the outside of your form boards, screwing or nailing them securely. The top of the form should be exactly at your desired finished concrete height. Use your level constantly. Even a small variation here becomes magnified once the concrete is poured.
Apply a thin coat of form release oil (or vegetable oil in a pinch) to the inside faces of the form boards. This prevents concrete from bonding to the wood and makes removal much easier after curing.
Install expansion joint material anywhere the new patio will meet an existing structure: the house foundation, existing walkways, or steps. This foam backer rod or asphalt-impregnated fiberboard allows independent movement between structures and prevents cracking at those vulnerable transition points.
Step 4 – Adding Reinforcement
Concrete is incredibly strong in compression but relatively weak in tension. Reinforcement — whether rebar or wire mesh — provides the tensile strength to prevent the slab from cracking and separating when stressed.
Rebar vs. Wire Mesh: Which Is Better?
This is one of the most debated questions in DIY concrete work. Here’s the practical breakdown:
- Rebar (#4, spaced 18 inches on center) – Superior strength; best for larger patios, heavy loads, or areas with unstable soil. More labor-intensive to install.
- Wire mesh (6×6 W2.9) – Faster and easier to install; adequate for smaller patios on stable soil. The key is ensuring it sits in the middle third of the slab depth, not lying flat on the gravel (where it does almost nothing).
- Fiber reinforcement – Polypropylene or steel fibers added directly to the concrete mix; increasingly popular in 2026 as a supplement or replacement for mesh in residential applications. Reduces plastic shrinkage cracking significantly.
For most residential patios in 2026, a combination of wire mesh plus fiber-reinforced concrete represents the best value — good protection without the cost and labor of full rebar grids.
Place rebar chairs or wire mesh supports under your reinforcement to hold it approximately 1.5 to 2 inches above the gravel surface, positioning it in the lower-middle of the slab thickness. Tie rebar intersections with wire ties.
Step 5 – Mixing and Pouring the Concrete
This is the most time-sensitive phase of the entire project. Concrete begins to set from the moment water contacts cement, and you typically have a 90-minute working window with ready-mix trucks — less in hot weather, more in cool conditions.
Ready-mix vs. bagged concrete: For patios over 50 square feet, order ready-mix delivered by truck. It’s more consistent, saves enormous labor, and is often more cost-effective per yard. For smaller projects or areas with difficult truck access, 60 or 80-pound bags are workable. A 200-square-foot, 4-inch-thick patio requires approximately 2.5 cubic yards of concrete.
Pouring sequence:
- Start pouring at the corner farthest from the truck chute or your mixing area
- Work systematically toward the truck to avoid walking through freshly poured concrete
- Use shovels or a concrete rake (not a garden rake) to spread concrete evenly
- Use a concrete vibrator or rod the concrete with a piece of rebar to release air pockets, especially along form edges
- Don’t pour too much water into your mix to make it easier to work — this weakens the final product dramatically. Target a slump of 4–5 inches for workable but structurally sound concrete
Screeding: Once concrete fills the form, drag your screed board (a straight 2×4) across the form tops in a sawing motion to level the concrete to the form height. Work in small back-and-forth sections, filling in any low spots.
Step 6 – Finishing the Surface
After screeding, you’ll notice bleed water rising to the surface — a thin sheen of water that indicates excess moisture migrating upward. Wait for all bleed water to evaporate before proceeding with finishing. Working the surface while bleed water is present weakens the top layer and causes dusting, scaling, and cracking down the road.
Once the bleed water is gone and the surface has lost its sheen but isn’t yet hard:
- Bull float the surface to embed aggregate and close the surface pores. Long, smooth strokes work best.
- Hand float edges and areas the bull float can’t reach.
- Cut control joints with a jointing tool or circular saw. These planned weak points channel cracking into straight, predictable lines. Space them no more than 2–3 times (in feet) the slab thickness (in inches) — so for a 4-inch slab, joints every 8–12 feet.
- Apply your chosen finish: drag a stiff broom across the surface for a standard broom finish, or use stamps/exposed aggregate techniques for decorative finishes.
For stamped concrete, this is when you apply color hardener, release agent, and stamp patterns. It requires practice and good timing — ideally done with an experienced helper or by watching detailed technique videos beforehand.
Step 7 – Curing Properly
Curing is the process of keeping concrete moist and at the right temperature so it reaches its full design strength. This is where many DIYers get impatient — and where the project either succeeds or quietly fails.
Concrete does not “dry” to gain strength — it hydrates. The chemical reaction between water and cement continues for weeks. A slab that dries out too fast loses up to 50% of its potential strength. That’s not a small margin — it’s the difference between a 40-year patio and a crumbling mess within a decade.
Curing methods:
- Plastic sheeting – Cover the finished slab with plastic immediately after finishing. Overlap edges and weigh down the perimeter. Leave in place for a minimum of 7 days.
- Curing compound – Spray-applied liquid that forms a membrane sealing in moisture. Easier on large pours, but don’t use it if you plan to apply a decorative overlay later.
- Wet curing – Burlap soaked in water laid over the slab and kept wet. Labor-intensive but excellent results.
Keep foot traffic off the slab for at least 24–48 hours. Don’t allow vehicles for a minimum of 7 days. Full design strength is achieved after 28 days, though the slab will be functional for light use after 7.
In 2026, sealing your finished patio with a quality penetrating or acrylic sealer is highly recommended — especially in climates with freeze-thaw cycles, heavy rainfall, or high UV exposure. Seal 28–30 days after the pour, then reseal every 2–3 years.
Common Challenges and How to Overcome Them
Challenge 1: Cracking
Some cracking in concrete is practically inevitable — but there’s a big difference between hairline shrinkage cracks (normal and manageable) and structural cracks that signal foundation movement. Prevent serious cracking by: using the correct water-to-cement ratio, adding fiber reinforcement, cutting control joints correctly, and curing adequately. If cracks do appear that are wider than 1/8 inch or show vertical displacement, consult a structural engineer before the next winter freeze.
Challenge 2: Surface Scaling and Spalling
Scaling — where the top layer flakes away — is most common in cold climates and is almost always caused by one of three things: overworking the surface while bleed water is present, applying deicing salts in the first two winters (never use rock salt on new concrete!), or insufficient curing. In 2026, sand-based ice management products are a much safer alternative. Prevention is far easier than repair.
Challenge 3: Poor Drainage and Pooling
Water pooling on the patio surface or near the house foundation indicates an insufficient slope or improperly graded sub-base. This is best caught in the planning and formwork stages. If you’re dealing with an existing patio with drainage problems, a channel drain system can be retrofitted at the low end, or a thin concrete overlay can be applied to rebuild the slope.
Cost Comparison: Patio Surface Materials in 2026
| Material | Avg. Cost/Sq Ft (2026) | Lifespan | Maintenance Level | DIY Feasibility |
|---|---|---|---|---|
| Poured Concrete | $6–$12 | 30–50 years | Low | High |
| Concrete Pavers | $10–$20 | 25–30 years | Medium | High |
| Natural Stone | $18–$30 | 50+ years | Medium-High | Medium |
| Composite Decking | $15–$28 | 25–30 years | Low-Medium | Medium |
| Stamped Concrete | $12–$22 | 25–40 years | Medium | Low-Medium |
DIY Effort vs. Project Phase: Time Investment
Estimated Time Per Phase (200 sq ft patio)
3–5 hours
5–8 hours
4–7 hours
6–10 hours
2–3 hours active
Frequently Asked Questions
How thick should a concrete patio slab be?
For standard residential patios used only by foot traffic and light furniture, 4 inches of concrete is the industry standard. If you expect vehicle access, hot tubs, or heavy outdoor kitchen equipment, increase thickness to 5–6 inches and upgrade to rebar reinforcement. Thicker slabs not only carry more load but also resist frost heave better in colder climates. Never go below 3.5 inches — anything thinner becomes vulnerable to cracking under even modest stress.
Can I pour a concrete patio in cold weather?
Yes, but it requires additional precautions. Concrete should not be poured when temperatures are below 40°F (4°C) or expected to drop below that within 24 hours without protective measures. In cold weather pours, use hot water in your mix, add accelerating admixtures, and insulate the finished slab with insulating blankets for the full curing period (7+ days). Many experienced contractors in northern climates successfully pour in cool weather using these techniques. Conversely, very hot weather (above 90°F/32°C) requires ice water, shade, and faster finishing crews to prevent premature setting.
Do I need a permit to build a concrete patio?
In most U.S. and Canadian municipalities in 2026, permits are required for concrete patios over a certain size — typically 200 square feet, though this varies significantly by location. Some jurisdictions also regulate proximity to property lines, drainage impacts, and impervious surface coverage percentages (especially in areas with stormwater management programs). Always check with your local building department before starting. Unpermitted work can complicate home sales and may require removal. The permit process typically takes 5–15 business days and costs between $50 and $200 for a standard residential patio.
Your Patio, Built Right: The Action Plan
You’ve now walked through every critical phase of building a concrete patio — from the first stake in the ground to the final coat of sealer. Let’s condense this into your personal action roadmap:
- Week 1: Finalize your design, check local permit requirements, call 811 to locate utilities, and order materials. Don’t skip the permit step — it protects your investment.
- Week 2: Complete excavation and sub-base compaction. Set your forms with obsessive attention to slope and squareness. This is your last easy opportunity to fix mistakes.
- Week 3: Install reinforcement, schedule your ready-mix delivery, and coordinate your pour-day crew (you’ll need at least 2–3 people for a 200+ square foot pour).
- Pour Day: Execute the pour, screed, and finish with focused urgency. Have your curing supplies ready before the truck arrives.
- Post-Pour (Days 1–30): Maintain curing discipline. Resist the temptation to use the space early. Apply sealer at the 28-day mark.
In 2026, the rise of smart outdoor living — integrated lighting systems, outdoor kitchens, and weatherproof entertainment areas — means your concrete patio isn’t just a slab of gray; it’s the foundation of a truly expanded living space. The decisions you make in the planning and foundation phases will define how well every future upgrade sits and performs.
So here’s the question worth sitting with: What kind of outdoor life do you want to be living three years from now? Because the concrete you pour this season is the platform that makes it possible. Do it right the first time, and it will outlast multiple trends, multiple sets of patio furniture, and quite possibly the rest of your time in this home. That’s not just a project — that’s a legacy improvement. Now get out there and build it.